Next week, I have to give a short introduction to the use of computers to the group (Great Western Embroiderers) with whom I stitch and exhibit. The aim of this is to awaken in those who are not familiar an awareness of the usefulness of digital and social media in the work we do. 'Short introduction?' I hear you say ... quite ... exactly the problem I have. But brief and distilled and the whetting of appetites is the only option without access to a classroom filled with computers and other hardware for everyone to use.
I've decided to focus on the manipulation of photographs for use in stitched textiles and to demonstrate some very basic techniques ... and I will be keeping it simple. In preparation (and to revise all I learnt when I took an online course earlier in the summer), I have been playing with a couple of my photos taken in Scotland on our recent holiday. Those chosen here are of driftwood sculptures on St Cyrus beach south of Aberdeen. The sequence demonstrates the process I've been experimenting with recently using a graphic tablet and stylus. Among many other things, it offers a wonderfully easy way of tracing images using the PC / laptop and from which they can then be printed directly onto fabric or paper.
The initial photo was taken from inside the sculpture and looking up, chosen for its graphic qualities. This was opened in Photoshop Elements 12 as a background layer and then converted to black and white. I find this conversion helpful in seeing the shapes in an image.

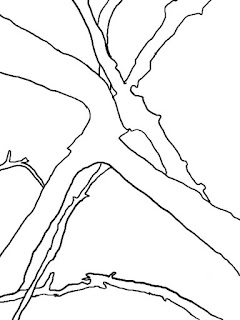
 The next step was to trace the outlines of the shapes that were wanted with the pencil tool on a layer placed on top of the photo. I drew using a medium sized Intuos Pad and stylus by Wacom. The shapes which resulted were to be filled with colour so it was important at this stage to make sure that all outlines were fully closed to prevent the colour bleeding and obliterating the shapes.
The original photo was then hidden and a second (blank) layer was introduced behind the tracing layer. This was flooded with white using the paint bucket tool so the tracing showed up well. The image was then tidied up and some unwanted lines were removed.


I've decided to focus on the manipulation of photographs for use in stitched textiles and to demonstrate some very basic techniques ... and I will be keeping it simple. In preparation (and to revise all I learnt when I took an online course earlier in the summer), I have been playing with a couple of my photos taken in Scotland on our recent holiday. Those chosen here are of driftwood sculptures on St Cyrus beach south of Aberdeen. The sequence demonstrates the process I've been experimenting with recently using a graphic tablet and stylus. Among many other things, it offers a wonderfully easy way of tracing images using the PC / laptop and from which they can then be printed directly onto fabric or paper.
The initial photo was taken from inside the sculpture and looking up, chosen for its graphic qualities. This was opened in Photoshop Elements 12 as a background layer and then converted to black and white. I find this conversion helpful in seeing the shapes in an image.


The original photo was then hidden and a second (blank) layer was introduced behind the tracing layer. This was flooded with white using the paint bucket tool so the tracing showed up well. The image was then tidied up and some unwanted lines were removed.


Colour was then dropped in using the paint bucket in various colour combinations and some were rotated and cropped.


I see this particular technique as very useful for apliqué and in creating fabrics with coordinated colours for quilt making since the colours can easily be transferred from one fabric to another and repeated, though I'm sure there are a thousand and one other uses.
Another image was created from a different driftwood sculpture ...

... and from a 'blind' drawing I made on the beach from a slightly different angle ..

... and traced in the same way from my original drawing. It was then cropped and filled with black, white and grey to accentuate the graphic nature of the image.

And now to find a landscape image for use with the same technique ... particularly useful perhaps for the members of our group given our next area of focus.
You've become quite the expert at photo manipulation, haven't you! Awesome work. Glad for those who get to learn from you. Have a great weekend. Hugs.
ReplyDeleteHi Connie Good to hear from you again. I'm certainly not expert ... I just like photo manipulation as a technique. It appeals to my wish for quick results!
DeleteA great weekend to you too. I bet it's warmer than it is here ...
Thanks for sharing. I never think to do that tracing step on a separate layer and then get rid of the photo altogether. Good tip!
ReplyDeleteI think layers really are the best bit about Photoshop for us in textiles, though it's got lots else to explore.
Delete