Gallery of past work

Saturday 29 December 2012

AFTERMATH

..... And now it's all over. Everyone's gone home and we're left in a post-Christmas haze with a huge pile of discarded wrapping paper and enough food for a week. (Why do I always over-cater?)

Our three grandchildren with
stockings, reindeer food
and Father Christmas' glass of wine
on Christmas Eve
Fond relationships have been cemented and the family bonded, which is what makes it all worthwhile. We had a wonderful time - greatly enhanced by the grandchildren who kept everyone amused when there was any possibility of boredom. All those capable mucked in and helped with food preparation and clearing up. Thanks to all for everything.

Mother and daughter in the garden
checking that the reindeer had eaten
their food on Christmas morning....
....they had ....such relief!
As always after Christmas, the soup factory is now in business. It is warming and comforting and a great antidote to all that rain and dismal weather .... and it uses up the left-overs and so makes me feel virtuous ....

This afternoon, I will start some stitching - a small piece to break me in gently as I focus my mind ready for something bigger after New Year.


Sunday 23 December 2012

HAPPY CHRISTMAS ALL

This is one of many stitch cards that didn't quite make it into full production as it took too long but I like the colours anyway so it comes with good wishes for Christmas.

Hope there's a great time had with family, friends or however you choose to celebrate or maybe you ignore the whole thing - but enjoy the holiday anyway.

We'll be 14 here altogether,  including 3 grandchildren under 3 - a noisy time will be had no doubt - but hopefully it will be happy - and after it's all over we will rest and sleep..... We'll need to!

Blogging is fun and it's great to be read so I'll be back in the New Year after the pleasure of family is over.

I look forward to having the time to stitch and complete rather than just imagining and designing in my mind as I do when I'm busy.....

Sunday 16 December 2012

Sandra Meech - Connecting Design to Stitch


At last I've found time for a proper read of Sandra Meech's lovely book, Connecting Design to Stitch, bought at the Festival of Quilts. There are some great exercises to try when I have the time to do them justice.

Arctic Snow  - Sandra Meech
(Reproduced with permission)
Meanwhile, I've been taking inspiration from the close-ups of the quilting lines she's used in the examples of her work. I particularly like Arctic Snow on P 21 for its simplicity and the way the eye is focused on the small area of strong colour and the movement and shape of the machine stitch.

Machine stitch sample
in my planning journal
If you've read my blog before you may know that the group I stitch with, Great Western Embroiderers, have an exhibition focusing on the Cotswolds coming up in the New Year. At the moment, ready for this, I'm working on a textile version of a geological section, representing the folds, faults and strata of the oolitic limestone. (This is not an original thought, I know.)

I'm finding it difficult as everything seems to become very linear and strip-like (no surprise really ...) . Making the work lively and with unexpected details is hard. I also tend to over-work things.

For better or worse, these are the results so far, in the order I did them. On each one, I've used a silk or cotton ground and painted the fabric with silk paints. Either before or after painting, I've machine quilted them.

Limestone layers with machine quilting and handstitch
ex[eriment and 8" square for group project
On the bright yellow one, I hand stitched with running stitches as it seemed to free things up and make the work look more unplanned and natural. As well as being a try-out, this will be my contribution to the group compilation of 8" squares.

Although I like the effect I've produced on it, I'm not sure it's going to be practical on a big piece like I'm planning. It will take ages. My dead-line to finish it is the of the middle of February and I have thoughts for THREE large pieces!


I always seem to have ideas beyond my ability to complete them.

I may have to think again.

Hand painted on a cotton ground
with lots of machine stitch, much
of it using distorted in-built stitches


Image taken from: Sandra Meech 2012, Connecting Design to Stitch, Batsford P21 - reproduced with permission from Sandra.

Wednesday 12 December 2012

FROST, MIST AND PHOTOGRAPHS

Frost and fog like we have had this week are not that common here so have to be relished. The effects had me reaching for my camera and set me looking at past photos. I have lots as I love the sight of frost on grasses and reeds, branches and twigs, and cobwebs and photograph them whenever I can.

This was the view across fields from the bottom of my garden this morning. Every twig and frond was covered in ice crystals. I was fascinated by how the hoar frost had attached itself to the (not very effective) rabbit-proof chicken wire and the barbed wire along the fence.

The rime had also picked out cobwebs on trees, fences, this wooden gate and even my car wing mirror.
Later in the day - but when I didn't have my camera to hand - the sun broke through the mist, low in the sky, and a soft pink light was cast across the fields - quite lovely.


The winter before last, we had very heavy frosts and I took a drive around the neighbourhood with my camera. I'd no time to do that today so had to make do with these photographs.

I'd found a frozen pond surrounded by reeds and bull-rushes and a dried umbellifera all coated in hoar frost. It had taken many days of continuous temperatures below zero to give this build-up and to pick out every stem, seed head and twig.

I'm sure these images, like so many things, will find their way into my textile work, though right now I'm not sure how.


Saturday 8 December 2012

Muchelney Pottery and floods on the Somerset Levels

Two days ago, I visited the Somerset Levels with a friend. We were trying to find our way to the Muchelney pottery in search of pots by John Leach, the latest member of the Leach potting dynasty.

This is a beautiful area, but troubled just now by flooding. We were amazed that the village of Muchelney itself remained cut off when we visited two weeks or more after the flooding and residents were still having to go in and out of the village by boat or by tractor.

It was a wonderful afternoon as we drove down, cold, calm and sunny. In the lowest-lying areas, field after field was flooded. Being near sunset, there were glorious colours in sky and water. I had my camera with me and took several photos. My friend, who knows how I often work, suggested the scene could make a lovely silk landscape piece. I think she may be right.

Despite the recent floods, the pottery, just outside the village itself, was accessible - just, and only from the South. The property had suffered flooding for the first time in living memory. The house was inundated, together with studios and wood store, but the shop somehow was not and was open and very happy to receive visitors.

The wood-fired stoneware pots are both useful and beautifully crafted. I have several pieces I've bought on previous visits and bought some more this time for Christmas presents.

The shapes are strong and satisfying and feel good and balanced in the hand. I love the rich brown figuring on the unglazed outside faces, caused by the flames lapping around the wares in the firing.

John Leach is shown throwing as on his website at: http://www.johnleachpottery.co.uk/ - well worth a visit if you like beautifully made - and useful - stoneware.

Sunday 2 December 2012

Textile Christmas Cards with Transfer Dyes


I just couldn't make the snow landscape idea for Christmas cards work satisfactorily. The design was disappointing and each card was taking too long to make. I have to get going on a rapid production line or it takes me months to make my cards.

Four of the cards in their mounts
and with a greeting
I've reverted to Plan B - always a good idea to have one of those....

Plan B is a design of random coloured bauble shapes in bright colours. The shapes were heat set onto polyester lining fabric in a fairly haphazard fashion using transfer dyes.

I cut out suitable shapes, both positive and negative from computer paper, and used them to mask areas as I coloured  the fabric, overlaying the colours and shapes.

Transfer dyes and masking shapes
on polyester lining fabric
I used powdered transfer dyes from Art Van Go which I mixed up ready in the little bottles shown and then painted pretty well neat onto A4 computer paper. The colours mix themselves as they are applied to the fabric so I didn't mix before painting.

To heat set the design onto the lining fabric I used an old domestic travel iron which gave the varied intensity of colour I wanted for these cards. With practice, you can judge how long to heat the fabric to get the effect you want. It's very important to use an old iron, not your prize new steam iron, as the sole plate can become stained by the transfer dyes.

The resulting cards are colourful, each one is unique and I'm quite pleased with them.


Now I just have to mount them into the card stock, add a greeting and my labels and the job will be done.


Tuesday 27 November 2012

Wiltshire Floods - Cricklade North Meadow

This afternoon, I drove to Cricklade North Meadow in Wiltshire - a favourite place for me in recent times to see wildlife and landscape. Since discovering this lovely place when our textile group took the meadow as a focus for work, I've visited many times, especially in spring for the fritillaries, in autumn and once in winter when the meadow was under a foot of snow. It's always a delight.

This time following the recent torrential rain, the flooding was spectacular.  The River Thames had burst its banks covering the fields in the flood plain and threatening farms and low-lying houses.

I took lots of photos in the late afternoon light. The colour palette was subtle and almost monochrome.

I love this one, with its contrasting areas of reflection and wind-ruffled surface and the willow trees silhouetted against the light sky, 


and especially this one with the stripe of thousands of brown dock seed heads in the distance and bare branches and rose hips in the foreground. 

This reserve is a Special Area of Conservation, administered by Natural England.  It's one of the finest examples of a lowland hay meadow in Europe - there used to be so many more. These sites are now so precious.

The meadow supports Britain's largest population of snake's head fritillary. Fortunately, this lovely flower thrives in meadows with winter flooding. Around half a million of the dark pink flowers can be found here each year in April and I am sure that next spring will be all the better for this flood. I can't wait....

Details of Cricklade North Meadow can be found at http://www.naturalengland.org.uk/ourwork/conservation/designations/nnr/1006112.aspx.


Sunday 25 November 2012

COLOUR INSPIRATION 

I draw on all sorts of things when I'm planning textile work but one of the main things is colour. For me, it often works in an oblique way. My eye may be taken by a colour combination in a garden, in the landscape around my home or perhaps in the wild places I visit in Scotland. Then later I use this colour image in a piece whose subject matter has nothing to do with the landscape where I first saw it - but may be that's how it works for everyone.

Silver Birch and heather in Glen Quoich, Aberdeenshire
Recently, I've been collecting together photos to use in work on the geology and rocks of the Cotswolds.

I love the acid yellow and brown in this photo taken in the Highlands of Scotland. I haven't manipulated the colour in Photoshop - this is just as I saw it.

And the rich brick red, browns and ochre yellows in this wall.


And the purple, yellow and green in this photo taken in a garden - though perhaps I use this combination too much. 


The last two were taken last summer in the walled Garden at Lydiard House, near Swindon in Wiltshire. The colours were wonderful and the weather was warm and sunny and very good for photography and I have a very clear image of the colours in my mind. 

I know there is no relationship between the subject matter in these photos and my geology pieces but their colours crept into my memory and I know I will use them as I finally make my colour choices - I can feel it coming ...... 

Wednesday 21 November 2012

Making Textile Christmas Cards


I've been making my own Christmas cards for several years now and people seem to enjoy receiving them. An example of last year's is shown left.

It was made using transfer dyes on polycotton. I ironed on background colours lightly and masked out snow flake shapes when I added the final colour. Then I over-printed the shapes again. On some - I get bored doing the same thing 100 times - I added some stitch but they weren't so successful, I don't think. This was one time stitch seemed unnecessary.

Not sure what to do this year. That's the problem - thinking up a new idea each year .... As you can see in the photo of my workroom (in creative? chaos), I've been playing around with discharging star shapes into blue Quink ink on silk dupion or cotton (cheaper but not so nice) and then using an Art Van Go printing stamp onto which I brushed thickened bleach with a bit of old car sponge. Hope my husband doesn't notice its disappearance!


I'm always tempted to turn everything into a landscape so I've added a strip of white sari silk to represent snow. I've then over-printed with Lumiere Halo Gold  paints and a star-shaped Indian wood block. I quite like the effect - just not sure if it's all that Christmasy.

Will try out the idea on my resident critic when I've added some stitch. I'm sure there will be new developments as I go along. He'll certainly have comments to make! Just hope they're positive as I seem to be rather lacking in new - and practical - ideas this year.

Saturday 10 November 2012

Framing and presenting work


Margaret Thatcher
Weaving in a box-type frame
I'm organising a 'show and share' session next week for our WCE group, Great Western Embroiderers, about framing and presenting work  - cheaply. That, of course, is the catch. We all know of framers who will charge over £100 to stretch and frame an A4 sized piece of work (and they do a good job) but for our group that is just not worth while if they are to offer work for sale at a sensible price.

Trips to Hobycraft or IKEA are much more likely to yield realistic results so I'm searching out suitable examples and hoping to glean some more ideas from the group.

I'm going to show them how I do my shallow box-type frames for my woven pieces as my contribution. These are  improvised from a suitably sized mount, spaced from the work and reinforced by strips of foam core board which also edge the box part of the frame. I then attach the work to more foam core board covered with a light muslin and put the whole thing into a deepish Hobycraft frame. It is then backed all over with hard-board to give more depth for the work - quite easy to do and not requiring many carpentry skills but seeming to look quite convincing - and really cheap.

Sea Sampler - in a commercial frame
I'll also show them a photo of my Sea Sampler - commercially framed and behind glass as a gift for a friend - so we can discuss choice of the frame colour to harmonise with the work.

I know also that it will provoke much debate about using glass. Buyers so often seem to prefer things behind glass but I don't normally do that for my own work and won't be for our upcoming exhibition - I almost never do, in fact. To me, glass seems to put a physical barrier between work and the viewer. There is almost always too much reflection and it stops people being able to see the details easily. I like people to be able to touch my work, and to experience the tactile character of the textile.

I know that there is concern about work getting dusty but I don't really find that a problem. A gentle blow and shake seems to be all that is needed. A friend recently gave me what sounds like a great tip for cleaning unglazed textiles when they've been on the wall a while. She gets out her hoover, covers the metal end of the wand with a pop sock, tightly attached with a rubber band, turns on the hoover and moves the end gently over the textile, about 1 cm from the surface. Dust is removed and textile undamaged. She assures me it does work. Do I dare to try?


Friday 9 November 2012

Workshop with Angie Hughes

I had a great day on Tuesday on a workshop with Angie Hughes in Lockeridge, Wiltshire, organised by the Marlborough branch of the Embroiderers' Guild. Angie travels all around the country giving workshops of one kind or another. I have previously spent two lovely weekends on courses with her at Farncombe Estate in Worcestershire. This day was as good as I remember the others being.

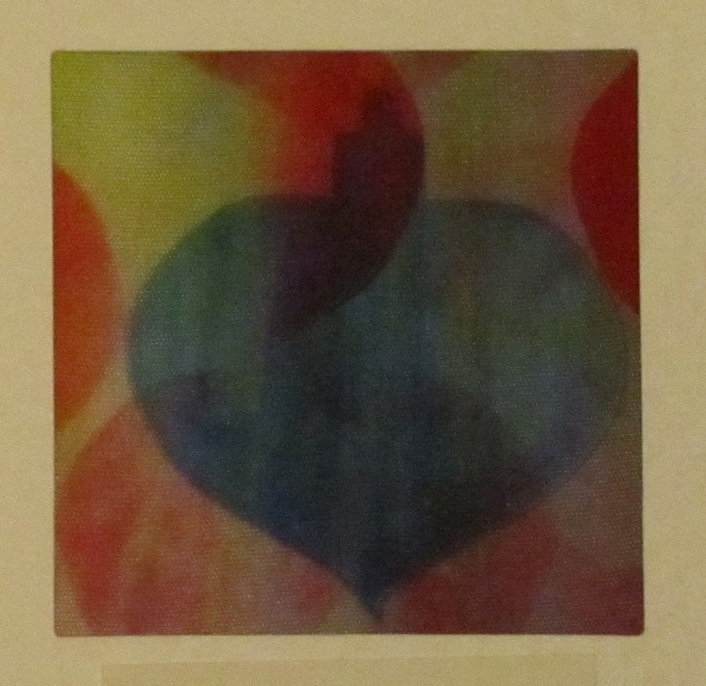
Exploring Velvet piece - so far .....
The workshop this time was called Exploring Velvet and we spent the day spraying with Dye-na-flow paints, discharging and printing white cotton velvet to prepare a surface for transfer foils and later for stitching. It was great fun and  I learnt a lot and thoroughly enjoyed myself. It's always fun to spend a day doing something you really enjoy with like-minded people.

The new thing for me this time was discharging the Quink ink we sprayed over the fabric paints with household bleach. I'd read about it but had never tried it. The results were spectacular and quick. I get impatient if I have to wait for ages for things to dry or for processes to happen when I'm trying something new so I found the speed very beguiling.

Exploring Velvet piece - detail
There were some interesting effects, especially where the Quink ink was sprayed on darker and the under-sprayed colours were stronger. The increased colour contrasts some other members of the group achieved were particularly striking.

After that, Angie showed us how to foil small areas of our work onto Bondaweb or Mistyfuse and various other fabric glues. As I think you can see above, for me, this was the least pleasurable part of the day as I found it quite hard to achieve a satisfactory effect. I found the very strong shiny surface made by the foils rather bold in comparison with my coloured surface which had turned out quite gentle in colour. However, for some of the group, it was the best part of the day. I guess it's all just a matter of taste and it was good to revisit the technique.

Applying painted Bondaweb or strips of silk instead of the foils was suggested as an alternative way of finishing off my work. I think I will try this when I finish my piece ready for a 'show and tell' display at the Marlborough EG meeting in the New Year.

Angie often offers this as a two day course with machine embroidery of the piece on the second day. As we had only one day, we now have to complete our pieces at home by layering with organza and machine stitching over the top. I'll look forward to it and to seeing how my piece turns out in the end.

Angie Hughes in her workshop
- taken from her website
Angie is a most entertaining and lively tutor with loads of experience and she shared all her knowledge with us most generously. Lots more details of her courses and her work can be found on her websites:

http://www.angiehughes.com/ and http://www.angiehughesonline.com/

... and there is even a photo on her home page of her with a piece just like the one she demonstrated for us yesterday.


Monday 5 November 2012

NOT A BOOKWRAP - AND EXHIBITING IN MALMESBURY

As I've mentioned before, I exhibit regularly with Great Western Embroiderers, a group of stitchers who meet regularly in Cricklade, Wiltshire. We're a really friendly and happy bunch and our exhibitions are full of varied work for which we have built up quite a following in the area.

Working with the group gives me a context for my work and the impetus to complete work. Most things I'm happy with end up, usually in a frame, on a wall - so there are many fewer UFOs (unfinished objects) floating around in my work space... and I manage to sell some of them into the bargain.

Under Our Feet I - Strata
Being with the group also makes me extend the scope of my work and try out new techniques. Right now, I am focusing on a series of pieces, inspired by the mellow, sand-coloured Cotswold stone which is all around us here in houses, buildings and stone walls.

That test geology piece I intended to turn into a bookwrap has metamorphosed into the wall piece left, following hand stitching and friendly advice! I had always planned that it would go into the next GWE Exhibition in Malmesbury in February 2013 but it will be good to see it on the wall rather than wrapping itself around a book.

Under Our Feet 1 - Strata (detail)
It was amazing how the running stitch and French knots unified the piece, giving points of interest across it. I'm really glad I decided to handstitch before I edged it all and backed it to turn it into that book wrap.

Now to work out how to show it - in a frame, off the wall, or as a hanging, from a narrow perspex rod. In order to persuade someone to buy it, I know that a frame would be the best. People almost always seem to prefer frames. The only problem is that the work is of a non-standard size so a frame will have to be made - cheaply ... I will have to talk nicely to my resident handy-man about the house!

Sheep and Shepherd
Shirley Watson
I know it is ridiculously early to be thinking about exhibitions in February 2013, but if you plan to be in the North Wiltshire area at that time, we would be delighted to see you.  The title of our next exhibition is The Cotswolds –A Stitching Experience and it will run from Tuesday 19 February to Friday 8 March 2013. Full details of the venue can be found at http://www.malmesbury.gov.uk/townhall.html and a poster will follow.

Above is the image which will be used for our poster. It's a piece stitched by our member, Shirley Watson, using her Bernina computerised sewing machine with added handstitch. Shirley's work is always lovely and this piece captures the spirit of our exhibition beautifully.

Saturday 27 October 2012

Line, contrast and drawing without looking


I've recently come across a fantastic book on drawing (via Amazon the great enticer). Drawing Projects: an exploration of the language of drawing, is by Mick Maslen and Jack Southern. The book approaches drawing from, for me, really unusual angles, providing all sorts of activities for freeing up, trusting eye and hand, and developing types of mark and mark-making. There are also features on well-known artists to inspire.

I love to draw and often choose to work in pencil to create line drawings. For me, there is something delightfully spare and simple about using line to evoke a mood or a landscape. It highlights the rhythms of the vertical and the horizontal, the straight and the twisting, and the visual relationships between them.

This book has been great as I've been exploring line in landscape. One of the many ideas developed in Mick Maslen and Jack Southern's book is to draw without looking at the results produced on paper - you merely look very carefully at the object you are drawing and draw in response to what you see - no visual checking back or elaborating as you go along. All the time you feel very carefully what your pencil is doing and ask yourself whether what you feel relates directly to what you are seeing in front of you - but you don't look....

In later exercises, you are allowed to 'take a sneaky look' at your drawing as it progresses, perhaps for example to work out where to put your pencil in relation to what you've already drawn. Even then you spend only perhaps 10% of your time looking at your results on paper.

Scots Pines and Silver Birches
by Loch Clarack, Dinnet, Aberdeenshire
I've been drawing in this way recently, both in Scotland, and also since I got back last week, using some of the photos I took while I was away. The pine trees and silver birches are always so drawable. They provide such good contrast for drawing - and also for photography.

Pencil drawing of birch trees and view across
Loch Clarack - drawn taking a sneaky look
The scots pine trunks have a controlled, architectural quality about them. They are strong and straight and branches are sparse so there is a long length of trunk and few low-growing leaf branches to obscure the view of them.

In contrast, the birch trees are fragile and random, reflecting the wild and unchanging nature of this landscape. Their leaves are fine and delicate and the slim trunks and branches twist at unusual angles and lean and interweave.

I have tried to capture all these qualities, especially recently the brittle branches and delicate leaves of the birches. Suggesting their haphazard nature was especially difficult.

Tree outlines Glen Tanar, Aberdeenshire - much drawn without looking,
but I allowed myself one or two sneaky looks


It is impossible to draw every tree trunk, branch or leaf but this approach has seemed to help me suggest the mood and the random nature of growth, if nothing else. Whether I've achieved this in the drawings in this post I'm not sure, but they've been a pleasure to do.

I suspect, like all other art work, it's work in progress ...........

Saturday 20 October 2012

The Dee Valley in Autumn

We've just come back from ten lovely days in Scotland, staying in Kincardine O' Neil on Deeside, west of Aberdeen. The Dee Valley at this point is wide with fields running down to the river but the mountains gradually encroach on the agricultural land as you drive up towards Braemar and beyond, until the valley climbs and narrows to become moorland.

Autumn at Brig O' Feugh
We've been many, many times to this part of Scotland and I have a large bank of photographs to remind me of the beauty of the place. It's never far from my mind and images of the area seem to find their way into all my art and textile work, one way or another.

This time, we stayed close to home and revisited many of our favourite local places. The colours were working their way up to being truly spectacular, with the help of heavy overnight frosts - although we had to return home this time before the process was totally complete.

Rosebay Willowherb
near Kincardine O'Neil
Rosebay Willow Herb
colour inverted and enhanced
In the woods near the house where we stay, there is always a clump of Rosebay Willow Herb under the pine trees on the track down to the river. In autumn, it turns to a glorious, but subtle, range of yellows, oranges and pinky browns and has beautiful soft cream wispy seed heads. I took more pictures again this year - the colours always seem slightly different - and have had fun enhancing and inverting in Adobe Photoshop, giving thoughts for future stitching .....

Loch Clarack looking west
Long shadows enhanced
and colour removed in Photoshop
On another lovely sunny afternoon, we drove west to Dinnet, up the valley, and walked along the side of Loch Clarack to Loch Kinnord. The colours and especially the shadows cast by the scots pine trees in the gently slanting sun were wonderful. I've seen (and photographed - and blogged) similar before but this afternoon seemed especially beautiful and the shadows particularly crisp.

Silver Birch trees near Loch Kinord


I also love the silver birch trees around the loch and we found some twisted lichen-covered trunks, sitting in pools and casting fascinating reflections. At risk of being repetitive again, I had tree trunks like these in my mind's eye when I worked the hand-stitched piece I posted in July.

Dead Birch tree, Loch Kinnord
Further round the loch is this dead birch tree. I recently manipulated the photographs I took when we walked this path last year. The tree was silhouetted against the sky and taken from several angles. This was the inspiration for hand stitching on a transfer dyed ground. I always like to have what I regard as 'stitch doodles' on the go and this was one of my most recent. I'm not sure it's one of my best pieces and I've yet to finish it but it was great fun to do and reminded me of this lovely place.
Dead Tree - Loch Kinord
Seeding stitch on transfer dyed ground


So much of what I do seems to be inspired by memories, in one way or another. Now, perhaps, I'll begin to consolidate my photos and memories from this visit - drawing, painting and creating paper images before I stitch - I can't wait... I'll post some of the results in coming weeks....

PS At the risk of turning this blog into a travelog, if you visit north east Scotland and want to follow this walk, details can be found at http://www.royal-deeside.org.uk/rdvillages/dinnet4.htm. It's a gentle, generally flat, wander from loch to loch and from one lovely view to another - beautiful....


Wednesday 17 October 2012

Silk Landscapes and Cushions

One of the things I most enjoy doing is exploring landscape and its rhythms, colours and shapes and I find silk so useful for evoking the landscapes around me. I machine stitch on it, weave with it and hand stitch on it and with it - it is so versatile.

Glastonbury Tor from Baltonsborough, Somerset
The piece shown left was inspired by Glastonbury Tor as seen from the garden of a great friend. I chose the colours of the silk strips to give a sense of perspective and then couched on the spun silk yarns for foreground interest and texture. The fact that the silk - especially if it is shot silk - frays in interesting ways is excellent for suggesting trees or hedgerows or even a range of hills. This piece was bought at exhibition and is now privately owned but it remains one of my favourites as it evokes strongly for me the sense of space and distance seen from my friend's garden.

Geology sample ... or book wrap?
I've recently been experimenting with machine stitch on silk strips for a piece I am working on that describes the geology of the local Cotswold area and its effect on landscape. I've been trying out several of the built-in stitches that come with my Silver machine to see if they will give the effect I want. I've found before that these can be stretched and distorted over the fabric by pulling the piece through under the needle at a faster rate than the feed dogs would deliver.

This was quite fun to try again, but I think I'll need to develop the main piece in other ways. Because the strips are narrow, it all looks too horizontal and similar in width. It may well be that this sample will ultimately become a book wrap - even though that will mean I have to finish it off properly and zig-zag the edges - the most boring of jobs! But before I do that I will handstitch a little to resolve the piece further.

Green and Red cushion
 On the rare occasions I find myself making something useful (rather than just decorative), I again raid my stash of silk - in the case of the photo to the left, to make a cushion. The colours are easy to exploit and develop with the help of other yarns and machine threads. I often combine the strips of silk and the spun yarns with ribbons and wools and then stitch heavily to give texture and a hard-wearing surface. Using metallic threads and yarns increases the surface appeal still further. This - and its twin - were made for a friend and now sit on her sofa.

Now to work on that book wrap ....